FN+P swaps Mac Layout to PC ( hold for 3 seconds) FN + O swaps PC Layout to Mac ( hold for 3 seconds)
Introduction
I’m a big Linux fan – but I do appreciate Apple Hardware. Not their software, but their hardware. The quality of the Apple hardware is just on another level and I am looking forward to the day the Asahi Linux team gets the M1 Air in shape for comfortable everyday Linux use. (I am putting my money where my mouth is and I am sponsoring them on Patreon…)
Until that day, however, I am using the Mac Book Air I bought in early 2015 which is still running strong on Kubuntu.
One tiny, yet powerful thing I really appreciate about Macs hardware is the location of the “Ctrl” (or Command ⌘) key on the keyboard. I find it so much more convenient to access control via my thumb rather then using my pinky.
This blog post is about setting up Linux and Windows on both Mac and non-Mac hardware to have the same “Mac-like” experience when typing.
Hardware Configurations
I usually interact with one of 3 possible combinations
Linux running on a Mac Book Air
Windows running on various PC hardware
MacOS running on Mac Hardware (this happens extremely seldom)
Each of those, I use with the respective inbuilt keyboard or my shiny Logitech MX Keys keyboard which can switch between laptops at the push of a button. My MX Keys is connected via Bluetooth – this is important to note as some of the keyboard changes below are only officially described to work for non-Bluetooth connections.
Configuration 1 – Linux
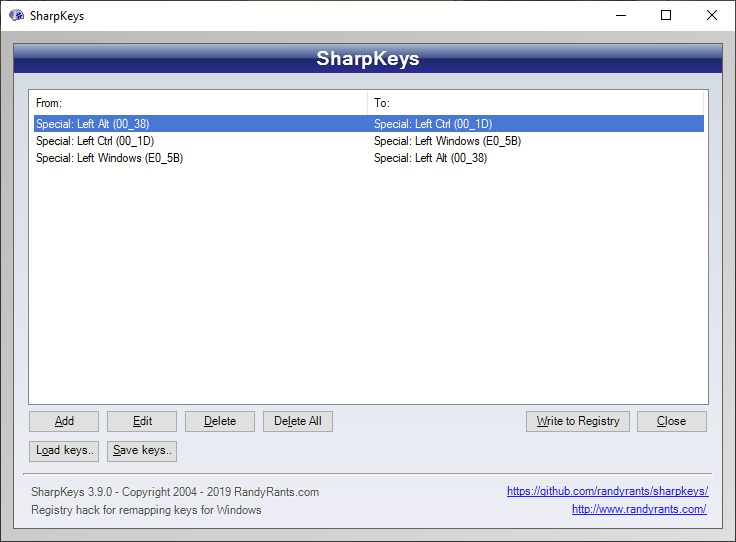
For my Linux machine, I use the following ~/.Xmodmap
This configuration allows me to use the Mac keyboard’s Command ⌘ button to act as my CTRL and the “control” button as the Windows ⊞ key. In other words, the modifier keys are interpreted from left to right as Windows, Alt, Ctrl on the inbuilt mac keyboard.
To ensure that the MX Keys sends its data the same way, the underlying configuration must be the same. Unfortunately, as can be seen on the picture above, the Alt and Windows ⊞ key in the Windows configuration of the MX Keys is switched counter to the Mac inbuilt keyboard.
The MX Keys determines this configuration during Bluetooth pairing. It defaults to the Mac keyboard layout if the OS is Mac OS and to the Windows layout for any other OS (including Linux). Obviously, Linux on Mac Hardware was not a use case considered.
Therefore, upon initial use, the MX Keys works with flipped Alt and Windows⊞ key as compared to the inbuilt Mac Keyboard keyboard. Luckily, it is easy to swap on the MX Keys itself once the correct incantation is known.
FN+P swaps Mac Layout to PC ( hold for 3 seconds) FN + O swaps PC Layout to Mac ( hold for 3 seconds)
In this case, the MX Keys and the inbuilt keyboard align themselves immediately. Thanks to the people at Logitech, the Mac/Windows configuration is stored on a per-connection basis, which means no further hacks are required.
Configuration 3 – MacOS
Luckily, nothing special needs to be done to make this work immediately since all parties involved work the “Apple way”.
Use the following on your MX Keys keyboard to switch between Mac and Windows layouts
In a warehousing world, labels are a big thing. I can’t imagine a warehouse working without some sort of label. Therefore IT consultants/developers have to build, design & test labels every once in a while. To make the label testing easier (and reduce paper waste), I set up a neat “virtual test printer” for Zebra labels.
The requirement
I want to see (not necessarily in paper form) Zebra labels when the SAP system spits them out. I don’t have a printer (at all – I hate printers – different story) and I’m not going to get one either.
A bit of landscape
I have:
A SAP system which is fully under my control
A tiny Linux box (OpenSUSE 42) that is fully under my control and somewhere in our server farm
Setup
Most of this setup is based on these guides/resources
On the Linux side, it’s a matter of setting up CUPS and xinetd and apache (not neccessary but cool :)).
For the purpose of this documentation, I will assume the DNS entry for the linux box is just “linuxbox”
Getting CUPS ready
This requires cups to run and (in my case) be available as a remote service. The most obvious step is starting the daemon, but also a
cupsctl --remote-admin
to enable web access.
If you want to print test pages and other beautiful pictures, you must ensure that the *.ppd drivers from zebratechcups are copied in some sort of subfolder in /usr/share/cups/model (if your distribution doesn’t already provide them – OpenSUSE didn’t). However, this is not necessary if you use the setup with the SAP Zebra drivers.
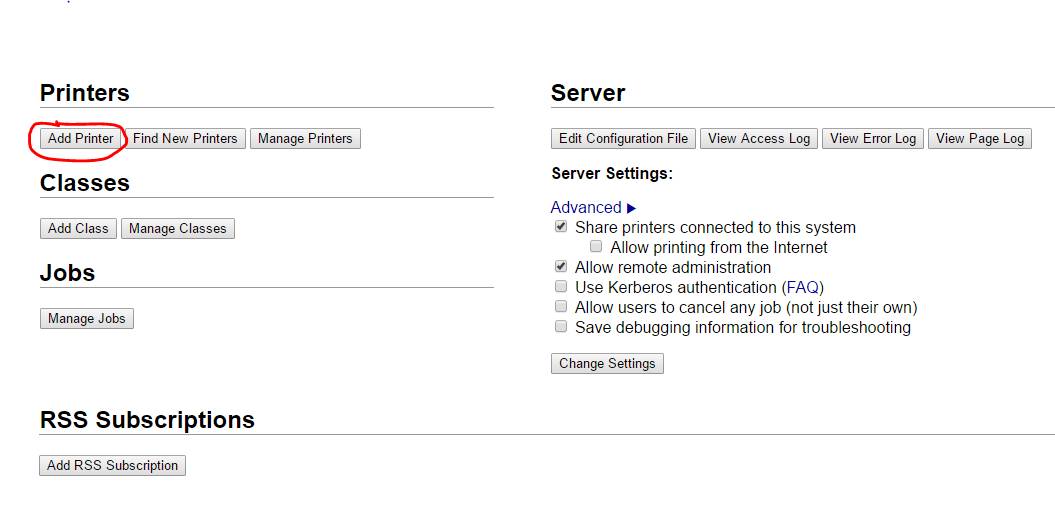
After a systemctrl restart cups.service, https://linuxbox:631/admin should be accessible (use root/root password for access – can be configured differently, but I’m not fuzzed). The next steps are best screenshot-ed:
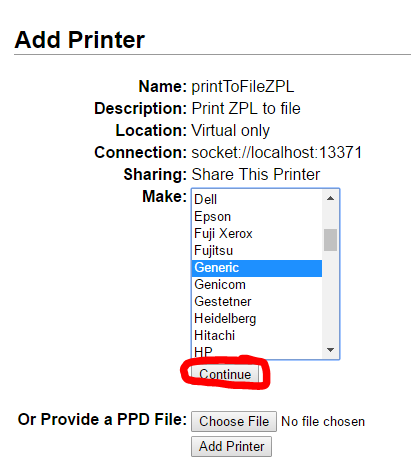
Add a new printer
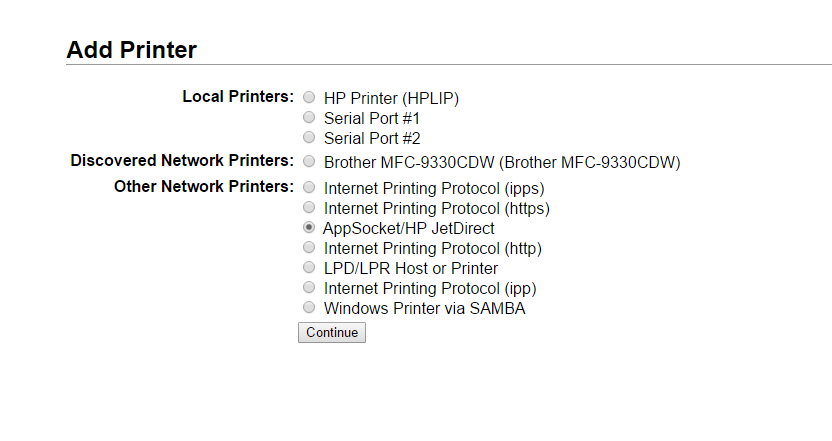
Select AppSocket/HP JetDirect
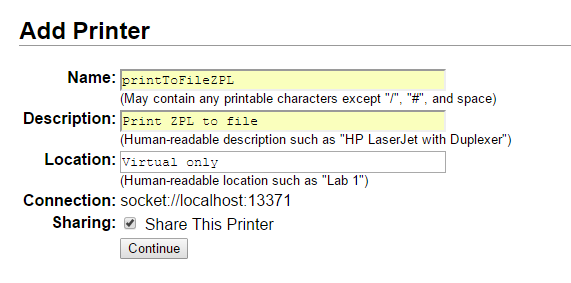
Use a socket://localhost connection string. Pick any unused port (we’ll use 13371 for this example). The corresponding service will be build later.
Pick any name and description. Remember the name though (we’ll need it for SAP). Make sure to share!
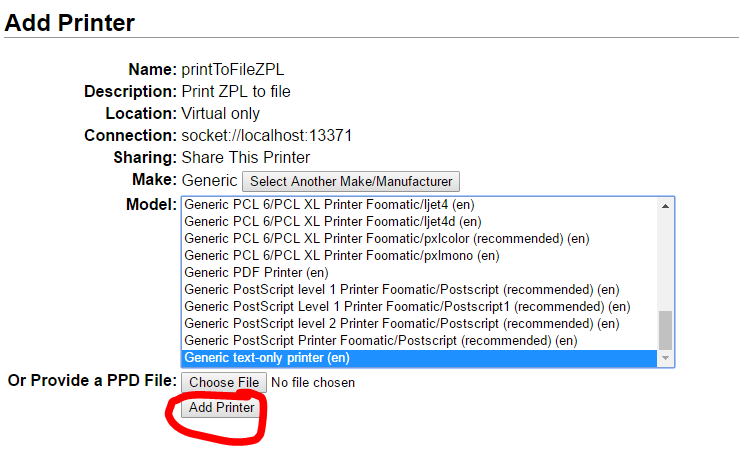
Select “Generic”.
Add the printer
To Zebra drivers or not to Zebra drivers
This is what happens if you use the CUPS Zebra drivers + SAP Zebra drivers…
As mentioned before, there are specific Zebra drivers available for CUPS. However, using them in this case is actually counterproductive (except if you want to try to print a test page in CUPS itself). Here’s why:
The CUPS zebra drivers are mainly great for taking whatever input you send to CUPS, creating a picture out of it and writing that picture in ZPL. Imagine the following path:
Some program prints -> CUPS takes picture and sends picture as ZPL -> Zebra Printer
However, SAP with Zebra drivers is smarter than this! It can actually create ZPL from the start. So if you use Zebra drivers in CUPS, you will get a picture of the ZPL instructions, not the desired interpreted output (see picture to the left)!
If it’s not available, make sure the ppd files are copied into some subfulder under /usr/share/cups/model (e.g. /usr/share/cups/model/manufacturer-PPDs/zebra) !
Xinetd Magic
Now that cups sends the ZPL to localhost:13371, we need to actually listen to this. Also, we want to listen to the LPD port to enable the SAP system to send the print spool directly to our linux box.
CUPS-LPD (so SAP is happy)
Enable cups-lpd /etc/xinetd.d/cups-lpd set “disabled = no”. The whole file should look something like this
service printer
{
   disable = no
   flags = NAMEINARGS
   socket_type = stream
   protocol = tcp
   wait = no
   user = lp
   server = /usr/lib/cups/daemon/cups-lpd
   server_args = cups-lpd -o document-format=application/octet-stream -o job-sheets=none,none
}
Beware to add the job-sheets=none,none option, otherwise CUPS-LPD will try to print a cover page each time you print. And for the generic text driver, that will result in aborted jobs!
Writing ZPL
Create a new file in /etc/xinetd.d/ (best to copy cups-lpd, call it zebraPrint and adjust). The file should look like this
service zebraPrint
{
   disable = no
   flags = REUSE
   port = 13371
   socket_type = stream
   protocol = tcp
   wait = no
   user = wwwrun
   server = /usr/local/bin/writeZebra
   server_args = /srv/www/htdocs/printouts 8dpmm 4x6
   only_from = localhost
}
A couple of explanations:
The port is the port you used in the CUPS printer socket setting before (adjust if you picked your own)
The user is my apache user (I’ll share the print outputs in a folder exposed in my webserver). Pick your own user if you want to do something else 🙂
The server is a python script that will be presented in the next section
The server args are
The path in which the output should be written
The dots per mm for the output
The size in inches (align with printer default settings in SAP!!!)
Finally you need to add an entry like
zebraFile 13371/tcp
to /etc/services and do a restart of xinetd (systemctrl restart xinetd.service)
Python Playground
The next piece on the Linux box is the python script that will actually put the outputs in the right folder. As configured in the previous section, the python script needs to be /usr/local/bin/writeZebra (or wherever you put it) and obviously needs a +x execution bit…
The script is not rocket science, so adjusting the script to your own purposes should be fairly simple!
Essentially, the script chucks the full input stream into a txt file in the folder we gave as an argument in the xinetd service. Afterwards, a web service by the good folks of Labelary is called to translate the ZPL into a picture. The web service has more options (e.g. download as PDF…) but I didn’t need it as of yet. RTFM for your own tweaks 😉 Also, there are limitations to what can be displayed (http://labelary.com/docs.html).
#!/usr/bin/python3.4
import sys
import datetime
import requests

filename = sys.argv[1] + "/" + datetime.datetime.now().strftime("%Y-%m-%d-%H-%M-%S")
f = open(filename + ".txt", 'wb')
printout = ''
while True:
   data = sys.stdin.buffer.read(1)
   if not data: break
   f.write(data)
f.close()

f = open(filename + ".txt", 'rb')
url = "http://api.labelary.com/v1/printers/" + sys.argv[2] + "/labels/" + sys.argv[3] + "/0/"
files = {'file': f}

r = requests.post(url, files=files)

f2 = open(filename + ".png", 'wb')
f2.write(r.content)

f.close()
f2.close()
Apache stuff
Now this part isn’t quite necessary, but if you have apache installed and are writing the outputs into the right folder, a configuration in /etc/apache2/conf.d/zebraPrint.conf could look like this
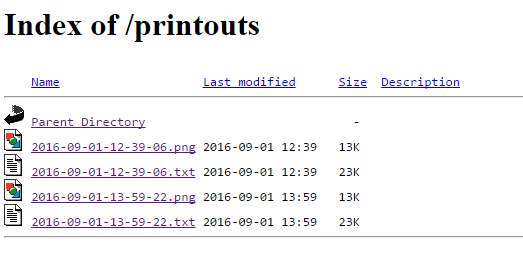
In my case this allows me to see all printouts via http://linuxbox/printouts
Give it a whirl
ONLY IF YOU ARE USING THE CUPS ZEBRA DRIVERS you can actually test at this point!
If you do (or feel like setting up a dedicated printer for it), in the CUPS interface (https://linuxbox:631/admin) you can trigger a test print for your newly created printer. You should see your first output appear. If not, try to fix it! 🙂
If you don’t want to download the CUPS zebra drivers, you can test the python script with
This should output the same ZPL and a picture in the current directory. A sample ZPL can be found here
The SAP side of the equation
Download the Zebra SAP drivers here. The readme.txt is pretty comprehensive, but for those that are a bit lazy:
Upload the two transports into the data / cofile directories on your SAP system and import the transport (PVDK000362) via STMS.
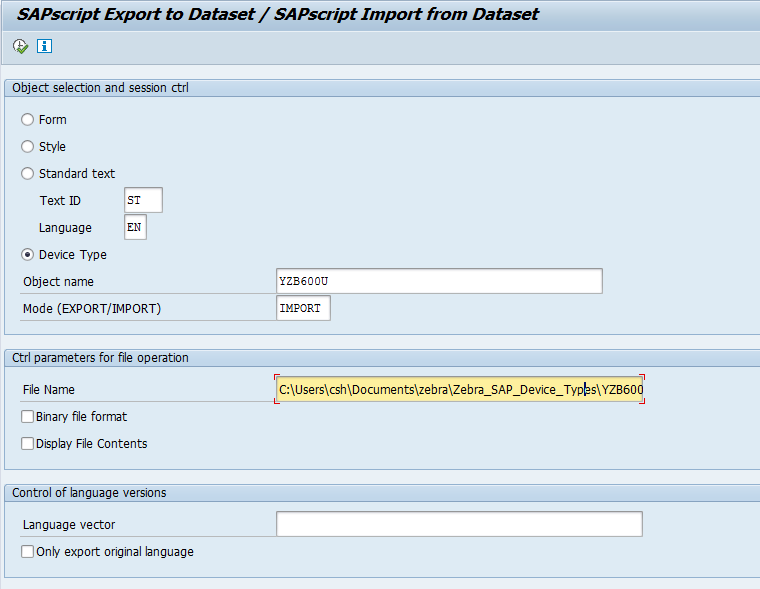
Use Report RSTXSCRP to upload the Device Types (*.PRI files) like so
Do the upload for all the drivers you need (probably best for all of them)
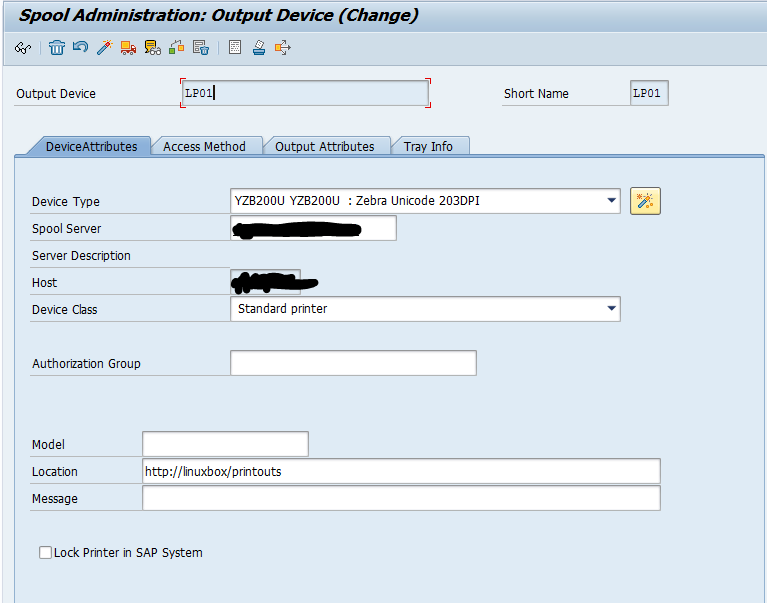
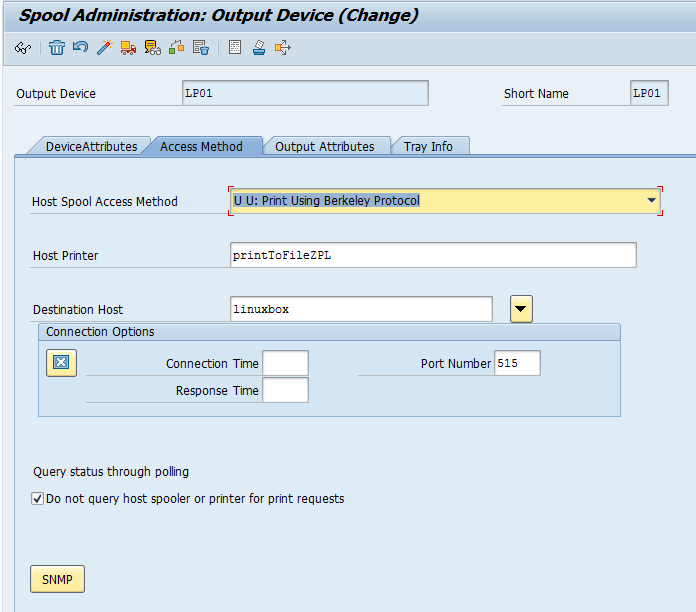
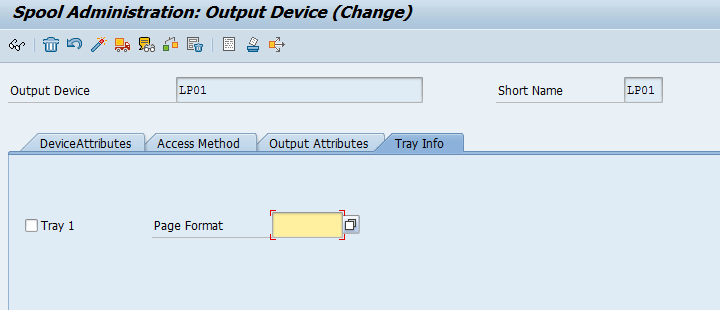
Configure your printer in SPAD like so
As you can see, I put the URL in the location to remind myself where the printouts will appear. Also, beware to reuse the exact same host printer name as configured in CUPS earlier (capitalization matters in real OSes!). There are probably more cool options, feel free to comment 🙂
Unicode
I tried to use the whole thing with the unicode drivers, but the UTF16 completely messed it up for me (the webservice and my python script couldn’t cope). So I reverted back to the standard non-unicode drivers.
When I started out with my first Android project, I did what probably everyone does when starting with a new Framework/Language/…, I went and read the official developer documentation. I must say, Google is doing a very good job in documenting Android on their Android developer page.
Unfortunately, there is one thing that really annoys me in their documentation, and that is the following statement right at the top of the content provider page
You don’t need to develop your own provider if you don’t intend to share your data with other applications. However, you do need your own provider to provide custom search suggestions in your own application. You also need your own provider if you want to copy and paste complex data or files from your application to other applications.
This has cost me a lot of “going in the wrong direction with things” and from everything I have seen in my Uni course about Android programming this semester, I’m not the only one lead on by this statement!
Why the rant?
What’s the deal with this you ask? Well, let me explain. This statement suggests that one needs Content Providers only if one wants to share stuff with other applications or do some fancy copy and paste. I feel this statement is just wrong. I would argue, every medium sized, database backed application needs a content provider! Not for sharing with other applications (that is obviously cool), but for other reasons which are not discussed on this Google’s help page! Let’s have a look at them
1. Model life cycle management
I guess except for very special cases, some sort of MVC is always a really good idea to have. If you disagree, I’d love to hear why, but at least in my experience MVC is the way to cleanly/professionally tackle a development that involves a UI and data.
So when designing your Android app, there will come a point when a designated model comes into play. Models, contrary to views and controllers, are usually unique in the application (across multiple Activities), thus often implemented by singletons. Great idea, but wait. If I want to have my model as a singleton, it would be handy if the Android Runtime would be able to provide a dedicated life cycle to that Model. Then, so the idea, if the system runs low on memory or feels like the model is not needed anymore, it could be discarded or trimmed. On the other hand, a custom build singleton model is treated like any other unknown object and only killed if the whole application is killed (unless the activity life cycle is relayed to the model which makes things even messier).
Point being: It is an elegant approach to tell the Android Runtime: This is the model, “deal with it!”.
2. Forces a good MVC usage
A point can be made, that not only is the model beautifully embedded into the application life cycle, the ContentProvider abstraction also forces a very sleek and generic access onto the model, making it hard to mess up the model part of the MVC pattern! This is not necessarily a direct benefit, but really good practice!
3. Observer Pattern out of the box
This is where my own model (in my first app) started to really hurt. Parts of the database would be updated by one activity or background task, and other activities needed to be informed. Of course, it is not that hard to write listeners/observers patterns in ones own model, but at one point, things become really complex.
The content provider helps in two ways:
Through content resolvers, “hooking in” as an observer is really easy and all life cycle again is managed!
Content providers enforce access via URI, which takes off a lot of the complexity involved in notifying a variety of different listeners depending on what changed. Especially when observers are able to “listen to this URL and its parents” the whole thing creates nice “notification trees” that can help to save on a lot of code (and errors!)
4. Loaders
Loaders are just AWESOME! I wish I would have understood them right from the start and be able to design around them, but I guess that’s the learning curve and the reason for this post. Loaders essentially allow to push the data loading in an asynchronous task (AsyncTask), return a result, and then hang around to watch for the data source changing and act upon it. Of course, including life cycle management tied to to fragement/activity of the loader so no memory is left behind!
I’m especially smitten with the CursorLoader, which queries a content provider on a URI, then return the Cursor which is plugged into an adapter, and then waits for the URI to have a change notification and deliver the new database result to the adapter again. That makes the UI thread essentially free all the time and encapsulates all background logic in a few lines of code! THAT IS AWESOME and should be taught from day one in all tutorials. And guess what is the prerequisite: a content provider!
5. Synchronization
This is actually mentioned in the android developer docs, but I’d like to point it out nonetheless: Content providers are a key piece of androids synchronization framework. I’ll probably do a separate post one of these days on how I used them to connect to Firebase, but more on that later…
I like HTTP. A simple, robust protocol that (in itself) has so many lovely features already if one knows how to use them. As such, I wanted to try and see if I could use the standard HTTP authentication more often for my websites (especially those that I don’t want anyone to access).
Of course, everyone who has ever looked at protecting their phpMyAdmin directory on their website probably came across the standard .htpasswd way of doing things in Apache. However, in my latest server setup, everything is run out of a MySQL database (e.g. email users & addresses for dovecot & postfix, this blog, my webmail, my website …). So I thought: maybe instead of having to constantly maintain .htpasswd files, I could utilize my database to do so. And it works quite nicely!
Prerequisits
mod_auth_mysql from somewhere (build yourself or get a package…)
Load it into your Apache configuration with this or something similiar…
This is my sample setup and not the ultimate truth, so it is possible to change DB name, user, password, tables and all of that (the Apache config shows that later)!
Create a database, user apacheUser and password secretPassword
CREATE DATABASE `apache` DEFAULT CHARACTER SET utf8 COLLATE utf8_general_ci;
USE `apache`;
CREATEUSER'apacheUser'@'localhost'IDENTIFIEDBY'secretPassword';
GRANT SELECTON`apache`.*TO'apacheUser'@'localhost';
I use a setup with two tables: Users and groups
CREATE TABLE IF NOT EXISTS `apache`.`users` (
 `username` char(100) NOT NULL,
 `passwd` char(100) NOT NULL,
 PRIMARY KEY (`username`)
);
CREATE TABLE IF NOT EXISTS `apache`.`groups` (
 `username` char(100) NOT NULL,
 `group` char(100) NOT NULL,
 PRIMARY KEY (`username`,`group`)
);
Obviously, one could create a foreign key relationship or even a group header table, but that’s too much hassle for the time being… The password column is filled with MD5 hashes of passwords (which is probably insecure, I know, but that was the easiest hash I could find in the configuration).
Setting up a password protection
Now this can go into any .htaccess file or (in my case), I put that in the actual virtual host definition for the hosts I want to protect.
<Directory /http/test>
   Options none
   AllowOverride All
   Order allow,deny
   Allow from all
   AuthBasicAuthoritative Off
   AuthMYSQL on
   AuthMySQL_Authoritative on
   AuthMySQL_DB apache
   Auth_MySQL_Host localhost
   Auth_MySQL_User apacheUser
   Auth_MySQL_Password secretPassword
   AuthMySQL_Password_Table users
   AuthMySQL_Username_Field users.username
   AuthMySQL_Password_Field users.passwd
   AuthMySQL_Empty_Passwords off
   AuthMySQL_Encryption_Types PHP_MD5
   AuthMySQL_Group_Table "users, groups"
   AuthMySQL_Group_Clause " AND users.username = groups.username"
   AuthMySQL_Group_Field groups.group
   AuthType Basic
   AuthName "Please log in"
   Require group testGroup
</Directory>
Just to point out the obvious, the above Apache configuration will force a user to authenticate against a username in table `users` with a password which (MD5 hashed) equals the string in the passwd column of `users`. Also, there needs to be an entry in `groups` with the username and the group ‘testGroup’, otherwise the user is not allowed either.
The values in bold are obviously things you probably want to change (mostly in accordance with the DB settings/user/pwd created above. The really important bit to figure out here was that AuthMySQL essentially takes these “settings” and just concatenates them into one large SQL statement. It took me a bit of source code browsing to figure out the two table approach described here, and I’m sure one could even go further to split it even more thoroughly.
I’m surely getting old… I remember back in the day when PHP websites were still… well… fully PHP and JavaScript was this little bit of nasty add-on that you didn’t want to do because IE6 would screw it all up 🙂
I’ve recently been doing some PHP&JS work and was playing around with jQuery! What a revelation! Back when I created my CCMS (http://git.mrman.de/ccms), I had to use iframes that would load pure JavaScript to get the “interactive” part done. Life is so much simpler these days, which leads me to the purpose of this post.
I am currently studying for my Systems Architecture Exam and thus am looking at the architectural aspect of things more closely these days. And given my latest web project (http://git.mrman.de/simpleStock) I became quite fond of what I would describe as an API based architecture. It’s probably not new and has a way more fancy name out there, but I wanted to share my 2 cents non-the-less.
The Architecture
In (a/my) traditional PHP setup, every page would be served more or less including PHP coding that read & formatted data from a database or somewhere. This was fine back then, but given the ease that jQuery enables AJAX calls and its powerful front-end possibilities, I have started to move all my PHP backend coding into a single file I call api.php.
Now this one file is obviously not all the logic, but it provides a gateway for all functionality that I want to be able to achieve. Essentially, it redirects the various GET/POST/… requests into a variety of PHP classes that actually do the requested job. In another project, I even went as far as to redirect the resource path into the api.php via apache modules, so that you could call something like /songs/1/tags and get a list of tags for song 1….
All communication in and out of the api.php is done via JSON.
On the front-end, essentially static pages are served (- they are not completely static since I use PHP to include the same menu everywhere but almost- ), and AJAX requests get the data via the api.php interface.
Pros and Cons
This allows the following (in my opinion really cool) things:
Beautiful View vs. Model abstraction with a little controller on both sides of the infrastructure
Utilizing HTTP the way God (or Roy Fielding) intended it to be. Error codes on errors, PUT, POST, GET, DELETE requests against resources, the whole shebang
This is really easy to test (manually & automatically)!
Re-usability for other applications
Cleaner code
Less data transfer
One can switch away from PHP easily 🙂
Of course there are disadvantages, the biggest being that the browser needs JavaScript and the speed and performance to be able to handle it.
Also, the api.php will stand by itself, therefore the design needs to anticipate all kind of inputs and make sure they are handled gracefully. However, I consider this actually and advantage since it makes for clean and robust code!
Things I haven’t properly tried yet
Authentication. So far I have used the standard Apache authentication module (actually, the mysql backed one – another blog post is to follow about that), but I would need to see how this plays out with the API and different access levels. However, I think it can be done and it would actually mean that the system would follow overall HTTP authentication rather than a PHP specific one which again, is AWESOME!
I would like to see how this thing scales in a larger environment. It would probably be pretty good, given that the front-end is essentially static (so you could almost use a CDN) and only the api.php hits the server
This is not directly related to this architecture, but more general. I’d like to try and introduce proper locking mechanisms in a stateless world. Not sure how to go about this yet (read a couple of promising approaches though), so stay tuned 🙂
I’ve been using Linux for > 10 years now and I love it so much that after two months of MacOS on my Macbook, I ended up installing Linux instead. Most of the time, I’ve been a KDE fan (I think my first KDE was something with a 2…) and for the last 7 years or so I’ve been using Kubuntu for my personal platform.
All this being said: WHAT THE FUCK IS HAPPENING IN Kubuntu 15.04??? This has got to be the worst Linux experience I had in a very long time! Not sure if Plasma5 is to blame or if just the overall setup + macbook is just plain wrong, but here’s a couple of my favorite things that have happened since I upgraded:
– Shutdown only works not even half the time (Mostly, screen just freezes, sometimes I get a kernel panic too….). I end up hard switching off my computer more often than not.
– Sleeping works for 5 seconds before something triggers the whole computer to come back up and stay up. Brilliant if you are in a hurry and end up putting a running laptop in a case. More than once I recovered my poor macbook with fan screaming from a case because Kubuntu had decided to come back on again….. (and obviously: stay on!).
– In 14.10, when I plugged in a screen, it was like a snip and everything was running smoothly on two screens. With 15.04 the whole system slows down considerably for 10 seconds until the whole thing is operational.
– Probably related to my shutdown problem, but KDE fucked up on me more than once now! Usually Plasma just doesn’t load anymore because something has gone haywire… Fixes so far (each on different occurrences):
Whipe .cache directory
Whipe .share directory
Delete .config/kglobalshortcutsrc.lock
… I should probably invest time in the whole shutdown thing ^^
For my job, I have to surf the SAP service marketplace every once in a while. For everyone who has done this before: It is no fun if you don’t have a SAP browser certificate in place since you will end up constantly putting in your S-user and password. Not sure why SAP load balances by actually exposing the different servers, but hey, that’s what they got the certificates for, right?
So for everyone wondering how to get this done nicely in Chromium on Linux: here it goes.
Log in on https://support.sap.com with your S-user. And by log in, I mean actually pressing the “Login” on top so that it says “Welcome, xxx” in the upper status bar
Get your certificate by clicking on your name and going to “Get a browser certificate (SAP Passport)”… this should prompt you with another password entry and afterwards Chromium should give you a message that you have a certificate installed now
Brilliantly, Chromium will, however, keep on bugging you about selecting this certificate every time you look at a SAP service page. Easier than password entry, but can still be improved!
Add automatic certificate selection to your chromium policy. This means to add the following file as root
I guess this is how you start a program, so it’s probably a good way to start a blog too. Let’s do this in ABAP…
WRITE 'Hello World'.
This blog is intended first and foremost as a knowledge base for myself on things I figured out. If someone else finds it helpful, go ahead and enjoy 🙂